Here's another Brooklyn-ish wallpaper for your desktop pleasure. Grab it in iPhone, iPad and widescreen desktop sizes below.
As before, usage rights are don't be a jerk.

Here's another Brooklyn-ish wallpaper for your desktop pleasure. Grab it in iPhone, iPad and widescreen desktop sizes below.
As before, usage rights are don't be a jerk.
Right-click on the canvas to view selected layers in Isolation Mode
One of the new features in Photoshop CC that might have slipped by you is a little gem that can help make your life easier when working on complex .psd files with tons of layers. Isolation Mode unclutters your Layers panel by only displaying the layers you're currently working on, and temporarily hiding everything else.
To enter Isolation Mode, with the Move tool active (press the V key on the keyboard), select the layer or layers you want to focus on, either by shift- or cmd-clicking on them in the Layers Panel, or by command-dragging (ctrl-drag, if you're on Windows) a selection around them on the canvas. With your cursor over the canvas, right-click and choose Isolation Mode from the resulting contextual menu.
Alternately, with your layers selected, you can click on the Filter menu at the very top of the Layers panel and choose Selected as the filter type.
Another way to enter Isolation Mode is to use the Layers Panel's Filter pull-down menu to only show selected layers
Right-click in the Layers panel to release a layer from Isolation Mode.
To remove a layer from the isolated set, right-click it in the Layers panel and choose Release from Isolation (if you don't see that option in your contextual menu, make sure your Move tool is active).
To add another layer to the isolated set, hover over it on the canvas, right-click, and select the layer.
Finally, to exit Isolation Mode entirely, you can always clear the Layers Panel's filters by clicking on the Filtering On/Off switch (it's the little guy at the top-right of the panel that turns red when filtering is on).
This is one of those great features that you probably didn't realize you needed, but now that it's here, you'll wonder how you ever got by without it.

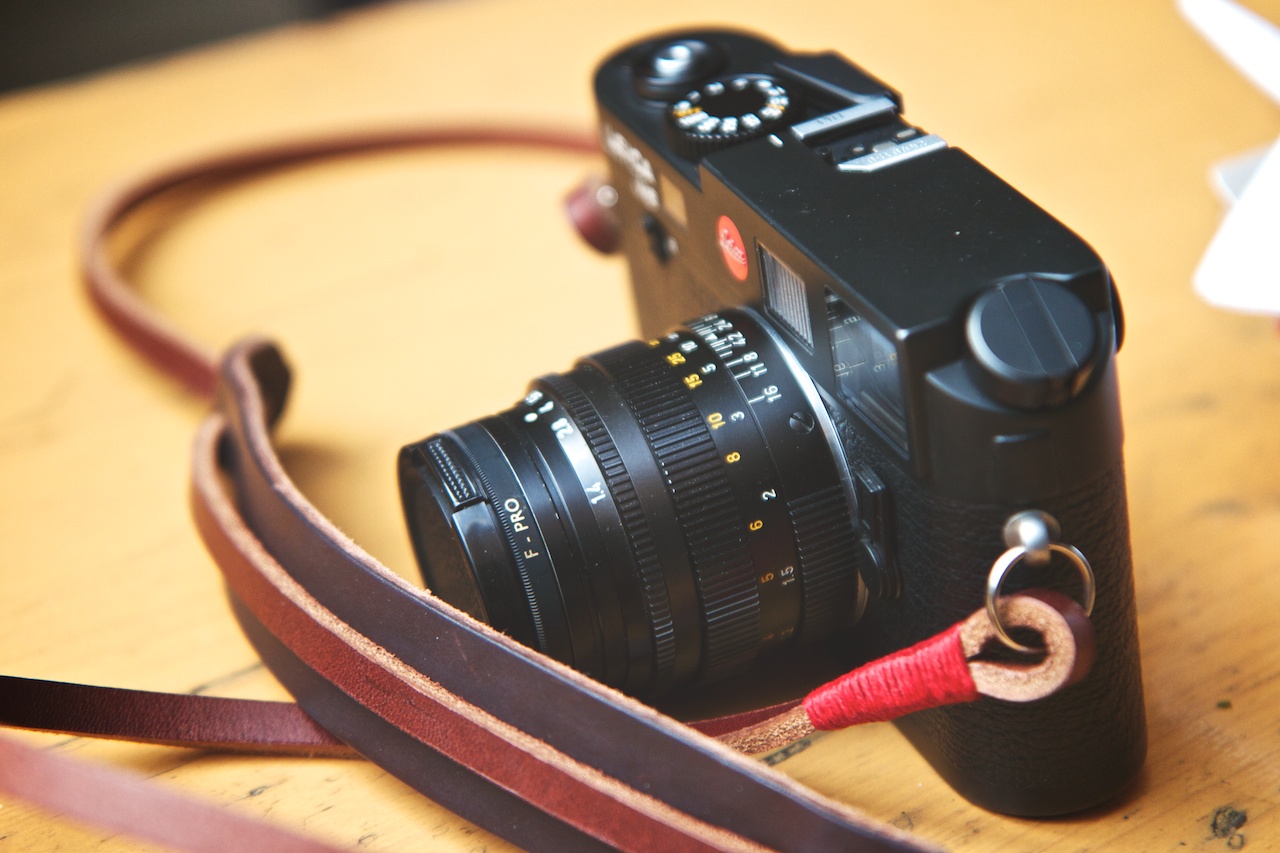
Lev Kuperman, Wedding Photographer
Meat Packing District, October 2012
This video by Michael Ninness of Lynda.com from this year's Adobe MAX conference is long, but it's absolutely worth watching. I've used Photoshop since version 3.0 (not CS3, noob), and I learned a ton of new techniques from this.
Editable Rounded Rectangles in Photoshop CC
This is the first in a series of posts I'm going to be doing about my favorite new features in Photoshop CC. For the uninitiated, CC, or Creative Cloud, is the new designation that Adobe is giving their suite of applications as they move away from the "boxed" retail model of the Creative Suite to delivering their software via digital download.
Today, I'm focusing on a new feature that I, and many, many others, have been begging for for ages: editable rounded rectangles.
It might sound like a small thing, but it really is a big time-saver. In previous versions of Photoshop, you'd create a rounded rectangle Shape layer and whatever settings you used when you created the shape were immediately baked in the second you released the mouse. If you had to replicate that shape elsewhere (either in CSS or maybe as a vector shape in Flash), there was no easy way to figure out what the radius of that shape was without a whole bunch of trial and error, especially if you weren't the original designer that worked on the file. Now in Photoshop CC, you can simply click on the rounded rectangle vector shape and you'll notice that the Properties panel is now populated with all the editable properties of that shape (or Live Shape, as it's labeled in the panel).
The Live Shape Properties Panel in Photoshop CC
Not only do the radii of the rounded rectangle remain editable (or live) after the fact, you can independently edit the radius of each corner, allowing you to create irregular shapes like the ones shown in the screenshot above, without having to edit the shape's vector paths using the pen tool, or by combining shapes with boolean operations, as you would have had to do in previous editions of Photoshop.
I'm thrilled with this new feature - it definitely goes a long way towards solving at least one of the issues that interface and icon designers have had with creating and resizing HiDPI (aka Retina) graphics, and is a big part of Adobe's continuing enhancement of Photoshop's vector graphics capabilities.
Stay tuned for more posts highlighting additional new features in Photoshop CC.
If you're looking to get a ton of Photoshop CS6 tips all in one place, this free e-book is for you. Requires signing up for PhotoshopCAFE's email list.
[via John Nack]
Design superstar Marc Edwards of Bjango (makers of fine apps including iStat Menus) has a great post over on the Bjango blog about taking advantage of a fantastic new feature of Photoshop CS6: layer search. His tip includes tagging layers with information that makes it easy to filter and update multiple layers at a time. It's one of those things that seems obvious when you see it in action - in fact I feel kind of silly for not having thought of it myself. Anyway, I definitely intend to incorporate Marc's tip into my workflow, and you should too.
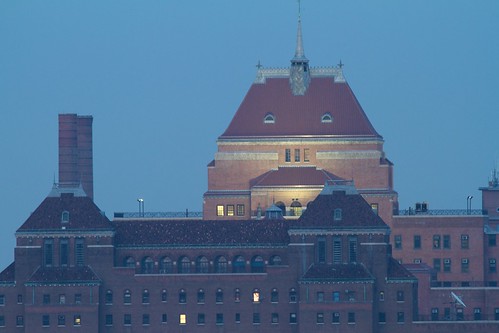
I have a nice zoom lens in my somewhat modest collection - a Canon 70-200 f/4L IS, which I sometimes use to shoot wildlife and portraits. However, for this weekend’s impending super moon, I wanted something with a little more kick. So I went over to Adorama’s rental center and picked up the Canon 100-400 f/4.5-5.6 L IS. I’ve never shot with a lens this big, so I decided to do a few test shots from my rooftop in Brooklyn.

The ESB is about 6.7 miles from my house, as the crow flies. Here’s what that shot looked like on the LCD of my Canon 7D:

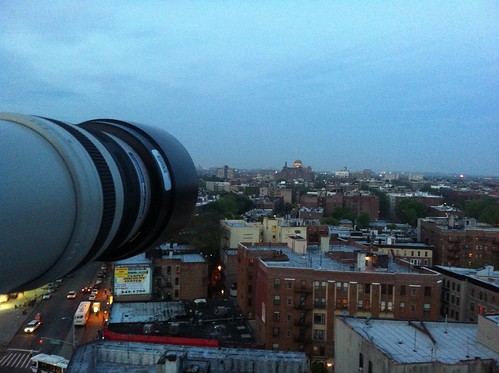
Here are a few more shots, just for fun.
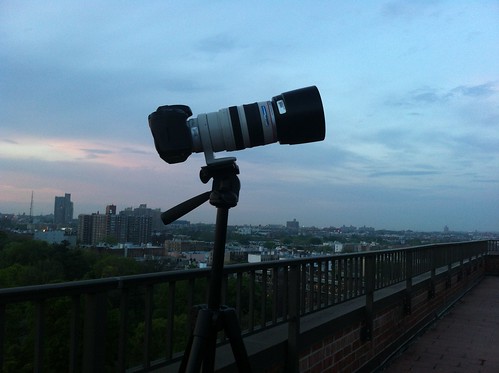
The setup:
And here’s a practice shot of the moon. I think it’s a nice shot, but my roof being the highest point in the immediate surrounding area, there’s nothing around to give it context. I’ll try to pick a different vantage point tonight.


Source: smashingmagazine.com via YearbookSmart on Pinterest
I’m still trying to figure out the usefulness of Pinterest in my own workflow, but in the meantime, I came across this “Pin” that I found really useful. It leads to a post full of useful photo retouching tips on Smashing Magazine. There are some really quick and easy retouching tips in there, as well as some general-usage Photoshop pointers. Good stuff - even if I don’t eventually figure out Pinterest, I’ll at least be using some of these tips in my own photography workflow.
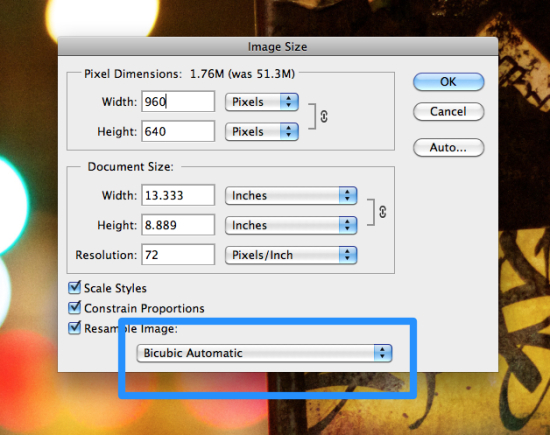
One of the new additions to Photoshop CS6 that will likely have slipped by you is a new addition to the way resizing images is handled. In the past, when using the Image Size dialog box to reduce an image’s size, you’d have to specify that you wanted Photoshop to use the Bicubic Sharper algorithm, which applies some sharpening to make images look their best when shrunk down. On top of that, it wasn’t a “sticky setting” - no matter how many times you selected that option, it Photoshop wouldn’t remember it, and you’d have to choose it every single time.
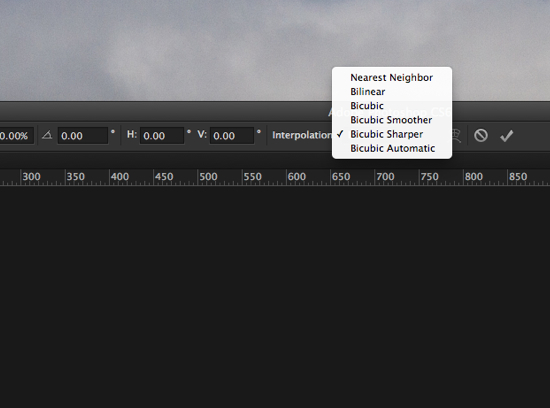
In CS6, although it’s still not sticky, Photoshop defaults to a new option called Bicubic Automatic. As you’d guess from the name, Photoshop intelligently chooses the best resampling algorithm for the job at hand (but you can still go in and override that choice if you like). As a bonus, Adobe has added the resampling options to a pull-down menu in the Options Bar of the Free Transform command.
(Kudos to you if you got the Public Enemy reference in the title of this post.)
;) Photoshop’s new dark UI is designed to match with other pro level appsLike me, some of you will love it, but I can already hear the moans of anguish from those of you who will
Photoshop’s new dark UI is designed to match with other pro level appsLike me, some of you will love it, but I can already hear the moans of anguish from those of you who will 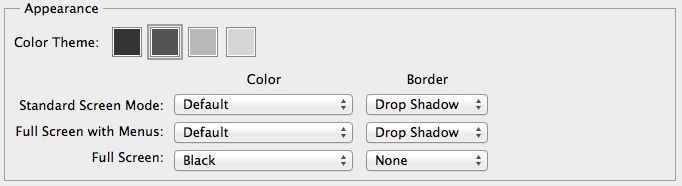 The Interface preferences give you four choices of colors, as well as custom options for Photoshop’s three screen modes
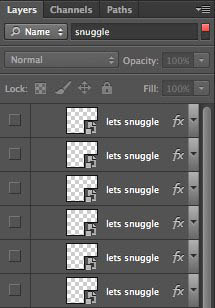 The Layers Panel can be searched by layer name or typeHoly smokes. If you’ve ever opened up a Photoshop document and gazed in despair at a Layers panel full of “layer 2 copy 2 copy”, then this feature needs no explanation. You can not only search for a layer by name, you can filter the list by layer type (pixels, text, adjustment, vector and smart object). Once you see it in action, you’ll wonder how you ever got by without it.
;) On-canvas editing is big in the new version of Photoshop, as seen here in the Iris Blur tool.Nowadays, everyone is doing all sorts of tilt-shift and selective focus trickery with their smartphones. You didn’t think that Adobe, the predominant imaging software makers, we’re going to sit back and not get in the game, did you? Not that there weren’t already ways of achieving these effects in Photoshop, but three new dedicated tools have been added to the Blur menu to give you these effects with pro-quality results. Field Blur blurs the entire image, Iris Blur creates an oval or rounded blur region, and Tilt Shift creates that miniature effect we’re all so familiar with now. Each of these tools has super-fast and responsive on-canvas editing tools that let you edit the effect without having to go off and fiddle with numbers in a dialog box.
On-canvas editing is big in the new version of Photoshop, as seen here in the Iris Blur tool.Nowadays, everyone is doing all sorts of tilt-shift and selective focus trickery with their smartphones. You didn’t think that Adobe, the predominant imaging software makers, we’re going to sit back and not get in the game, did you? Not that there weren’t already ways of achieving these effects in Photoshop, but three new dedicated tools have been added to the Blur menu to give you these effects with pro-quality results. Field Blur blurs the entire image, Iris Blur creates an oval or rounded blur region, and Tilt Shift creates that miniature effect we’re all so familiar with now. Each of these tools has super-fast and responsive on-canvas editing tools that let you edit the effect without having to go off and fiddle with numbers in a dialog box.;) Your Vector Shapes can now have strokes - and those strokes can have solid, gradient, or pattern fillsIt’s a subtle change, but Shape Layers are now Vector Layers, and along with the new nomenclature comes the ability to add all sorts of strokes, including… dashed and dotted lines! Yes, you read that right, no more copy-pasting from Illustrator - you can do it all right in Photoshop. Another feature that’s sure to be hugely appreciated by those doing pixel-precise work is the new Align Edges checkbox, which lives up to its name, forcing Vector Shapes to align to Photoshop’s Pixel Grid, eliminating those fuzzy, anti-aliased edges that we’d sometimes see when creating vectors in Photoshop.
Your Vector Shapes can now have strokes - and those strokes can have solid, gradient, or pattern fillsIt’s a subtle change, but Shape Layers are now Vector Layers, and along with the new nomenclature comes the ability to add all sorts of strokes, including… dashed and dotted lines! Yes, you read that right, no more copy-pasting from Illustrator - you can do it all right in Photoshop. Another feature that’s sure to be hugely appreciated by those doing pixel-precise work is the new Align Edges checkbox, which lives up to its name, forcing Vector Shapes to align to Photoshop’s Pixel Grid, eliminating those fuzzy, anti-aliased edges that we’d sometimes see when creating vectors in Photoshop.;) Video editing in Photoshop has gained powerful, but simple to use featuresThis is another area of Photoshop that has been improving progressively over the last several iterations of the software, and this version is no exception. New to CS6 is the ability to preform basic audio edits on a separate track, as well as to quickly add simple transitions between video clips. Also, where video has always been a feature of the Extended version of Photoshop, Adobe has decided that video editing is for the people, so now it’s in the Stsndard version as well.
Video editing in Photoshop has gained powerful, but simple to use featuresThis is another area of Photoshop that has been improving progressively over the last several iterations of the software, and this version is no exception. New to CS6 is the ability to preform basic audio edits on a separate track, as well as to quickly add simple transitions between video clips. Also, where video has always been a feature of the Extended version of Photoshop, Adobe has decided that video editing is for the people, so now it’s in the Stsndard version as well. ;) The 3D engine has been revamped completely, focusing on usability and performanceIn another lifetime, I was a pretty hardcore 3D guy, so the consistent, iterative improvements in the Photoshop 3D engine hit a special note for me. The difference between what Photoshop was capable of back in CS3 when 3D was introduced and what it’s capable of now is sort of mind-blowing. From the more streamlined interface, to the beefed up ray-tracing and image-based lighting capabilities, this is a comprehensive and welcome update.
The 3D engine has been revamped completely, focusing on usability and performanceIn another lifetime, I was a pretty hardcore 3D guy, so the consistent, iterative improvements in the Photoshop 3D engine hit a special note for me. The difference between what Photoshop was capable of back in CS3 when 3D was introduced and what it’s capable of now is sort of mind-blowing. From the more streamlined interface, to the beefed up ray-tracing and image-based lighting capabilities, this is a comprehensive and welcome update. ;) The original image, stitched from 15 carelessly shot images, and the results, produced using the Adaptive Wide Angle filterSeverely distorted fisheye images can be unwrapped using the Adaptive Wide-Angle tool, and it’s really, really impressive.
The original image, stitched from 15 carelessly shot images, and the results, produced using the Adaptive Wide Angle filterSeverely distorted fisheye images can be unwrapped using the Adaptive Wide-Angle tool, and it’s really, really impressive.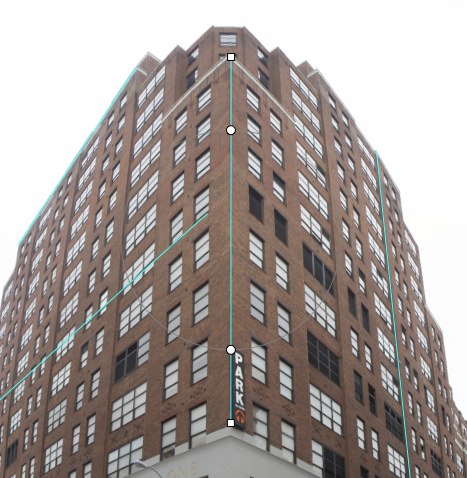 Trace lines in the photo that are supposed to be straight, and the tool, using lens profiles and metadata embedded in the photo (if available) will figure out how to correct it. This is another filter that elicits “oohs” and “aahs” when demoed, and for good reason, as the results are dramatic.
Swiping through my photo collection on my iPad, I came across a photo I shot in Stonington CT last summer, of a really dramatic stormy sunset at the pier.
![Sunset at Stonington [326/365]](http://farm7.staticflickr.com/6073/6069324644_1c234793e7.jpg)
Maybe it was my mood or something, but looking back on the image six months later, I thought that it was nice, but the way I had post-processed it didn’t really convey the ominous and dramatic feeling I had when I was standing there. So using Nik Software’s very excellent SnapSeed for iPad, I gave the image a bit more punch, as seen in the photo below.

Great - much more dramatic and otherworldly, but now SnapSeed has found every bit of noise my noise-challenged Canon G10 has imbued the image with, and exacerbated it. I guess a noisy photo is better than no photo… but there has to be a better option, right? Then I remembered the impressive noise reduction capabilities that Brian O’Neil Hughes showed off in his sneak peek of what’s coming up in the new version of the Camera Raw plugin, and then I remembered he mentioned that the same features are available in the new freely available Lightroom 4 Beta. I fired that up, and here’s the result:

Impressive indeed. I’m an Aperture guy, and my workflow is pretty well-entrenched in that software so I’m unlikely to make the switch to Lightroom (though I won’t rule it out entirely). Hopefully the folks at Apple step their game up in the noise reduction department, but in the meantime, once Photoshop Next (or whatever it’s going to be called) comes out, I’m definitely going to be incorporating Camera Raw 7’s noise reduction into my workflow for salvaging images - especially those shot with that poor old G10.

Here’s a logo I made for my online moniker, using nothing but Illustrator and Photoshop. Maybe I’ll blog a little bit about how I made it another time, as I think a lot of people aren’t fully aware of Photoshop’s impressive 3D capabilities.
Algorithm, my ass. This is f*cking voodoo magic.
Photoshop Tips: Spring-loaded Tools, Bird’s Eye View and Interactive Brush Sizing from Simon Abrams on Vimeo.
It’s been forever, but I finally decided to demo and upload some more Photoshop tips. In this video, I cover Spring-Loaded tools, Bird’s Eye View, and a couple of other quick tips that were introduced back in Photoshop CS4, but that may have slipped under the radar.
Corey Barker has an awesome tutorial over on planetphotoshop.com that demonstrates how to recreate the Iron Man 2 logo the new Repoussé feature in Photoshop CS5. The tutorial does a great job of showcasing Photoshop’s growing 3D toolset, and reinforces that there are more and more things you can do without needing to rely on a dedicated high-end 3D software package like Maya.

I was lucky enough to be a participant in Adobe’s private beta for Photoshop CS5 since last fall. One of the great things about the process is that you get first-hand exposure to the guys who are actually writing the code and implementing the features that eventually make it into the shipping product, and it really gives you an appreciation for how hard everyone involved in the project works. Of course there are tons of new features in the new version of Photoshop — like Content-Aware Fill/Healing, which has quickly become the “holy-crap-that’s-awesome” jaw-dropping feature of this release — but one of the ones that I’ve had the most fun with since I first got a chance to play with it is Repoussé.
Repoussé gets its name from a metal-working technique, where sheets of metal are shaped into shallow relief with a hammer. Its implementation in Photoshop allows you to turn the content of a layer — including text or vector shapes — into 3D objects. Creating 3D text is something that many have long wished for in Photoshop, because prior to now, you’d have to first go through the unwieldy steps of using Illustrator or some third-party software to create your text and then import it into Photoshop. If changes to the angle or position of the text or logo were necessary, that would involve going back out to the original source files, making changes, re-importing the art and applying your Photoshop manipulations all over again.
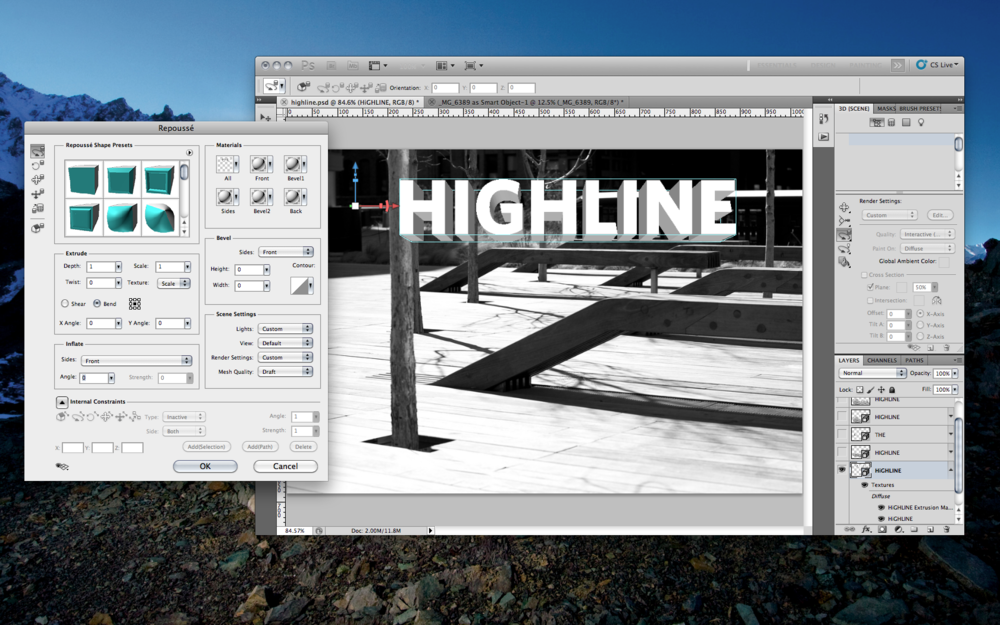
Repoussé on the other hand is simple to use. Simply select the layer with your text or artwork, and activate the 3D Panel (if it’s not already open, choose it from the Window menu, or choose 3D from the Workspaces menu at the top of the screen). Select the 3D Repoussé Object option and then click Create. (You can also navigate to Repoussé via the 3D menu at the top of your screen).
In the resulting dialog box, you can manipulate the way the 3D object is created - you can bend, twist, scale, bevel and inflate the surfaces of your 3D object. You can also punch holes in shapes, performing what 3D artists call boolean operations on them. The example at the top of this post was created by merging two 3D layers (one each, for the words “the” and “highline”), adding a ground-plane shadow-catcher, and adjusting the lighting and ground planes to match those found in the original photograph.
In combination with the other refined features of Photoshop CS5’S 3D engine, like image-based lighting, progressive rendering, camera depth-of-field and blur, and ground-plane shadow-catchers it is now possible to create more and more complex illustrations (and animations) within Photoshop, without having to use other software packages.
Here are a few more samples created with Repoussé:

